How to Hop
Market Recap
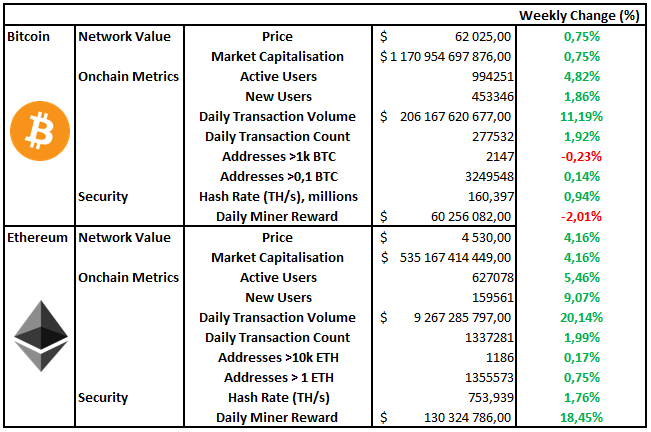
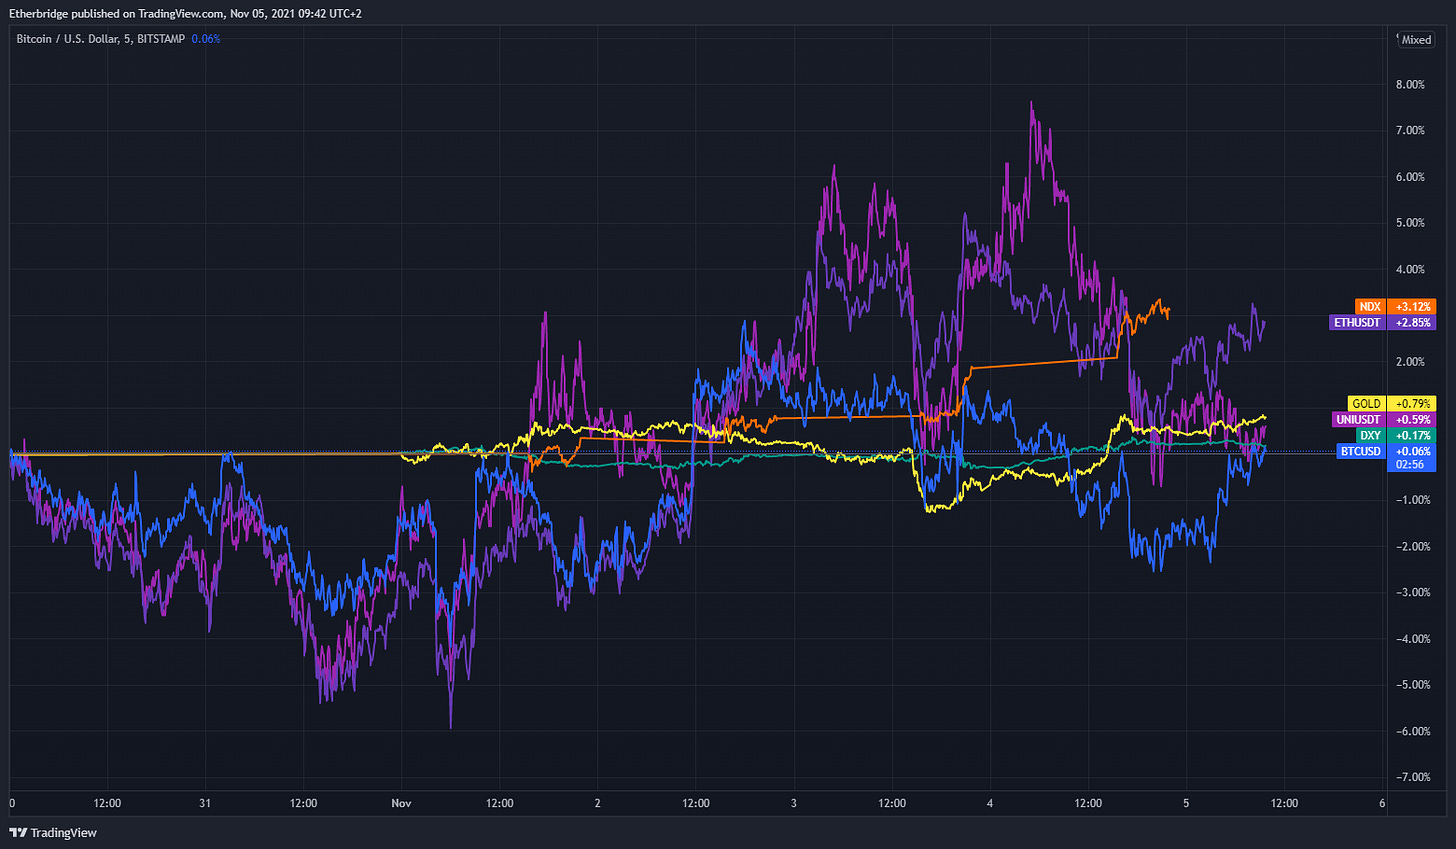
A Flat Week for Digital Assets
How to Hop
Last week we did a review of various layer 2 scaling solutions. These are the networks that sit on top of other blockchains and alleviate the pressure on the mainchain, and in theory, they allow you to process more transactions per second at a cheaper cost.
All these networks are designed differently and therefore have varying requirements when either depositing or withdrawing assets from the network. Consequently, we have seen the rise of projects like Hop Protocol, which abstract this process and make it easier for the end-user to move seamlessly between the Ethereum mainchain and various scaling solutions.
This week, we will give an introduction to the Hop Protocol and show you how to use it.
Hop Exchange
When designing a layer 2 solution, one of the primary considerations is ensuring that the network stays honest, especially when moving money back onto the mainchain. Therefore, many of the scaling projects in use today have what they call a network challenge period. This is the period in which validators operating between the chains have a chance to refute any transaction they deem invalid. Depending on the design approach they have taken, this time period can last anywhere between 15 seconds (one confirmation on Ethereum) to a week. A week is a very long time to wait for many, so liquidity becomes an issue.
One of Hop's main value propositions is that it allows users to send tokens from one scaling solution to another almost instantaneously without waiting for this challenge period to end. It does this by having market makers, or "Bonders", provide the initial liquidity at the destination chain in exchange for a fee. If you would like to understand more about the fees and how it works under the hood, please visit the following link.
Step One: How to Hop
In order to use the Hop Exchange and interact with Ethereum, you will require a MetaMask wallet. We have already written a comprehensive step-by-step guide on installing and using the MetaMask wallet here.
Once you have your wallet set up, proceed with the following steps:
Visit: https://hop.exchange/
You should land on the following page:
Click Use Hop
You will now be redirected to the following page:
Step 2: Using the Hop Exchange
Click Connect a Wallet in the top right
Please select your chosen wallet; in our case, it will be MetaMask
A pop up will appear where you are asked to confirm the connection between the Hop Exchange and your wallet. Follow the prompts and click Connect
You are now connected to the Hop Exchange
For the purpose of this article, we are going to send ETH from the Ethereum mainchain to Polygon.
On the right of Send, click on USDC
A drop-down menu will appear and show you all the different tokens that can be sent between the bridges
Please select what you would like to send; we are going to send ETH
Under From, make sure you select Mainnet
Under To, make sure you select Polygon
You should now see the following:
Input how much you would like to send across to Polygon
You will now get an estimate of how much you can expect to receive on the destination chain minus the fees you will pay
If you are happy, click Send
You will be asked to confirm the transaction, so click Send again
Your MetaMask wallet should now pop up and ask you to confirm the transaction; you will also now get an estimation of the gas fees you will have to pay
Click Confirm
Your transaction should now take some time to confirm. Hop Exchange states that the transfer should arrive at the destination address around 15 minutes after the transaction has been processed.
Step 3: Setup MetaMask to Connect with Polygon Network
While this is happening, we need to add the Polygon Network to our MetaMask wallet so you can interact with it.
Open up your MetaMask wallet, and at the top, click Ethereum Mainnet
You will now be presented with a drop-down menu. Click Custom RPC
You will be required to add the Polygon Network details manually. Enter the details below exactly as they appear and click Save
Now that you have added the Polygon Mainnet to your list select it from the drop-down menu where you found Custom RPC.
You should now see something similar to the below
You will now have to manually add Wrapped ETH (WETH) to your token list.
Click Add Token
Click Custom Token
Add the following under Token Contract Address - 0x7ceb23fd6bc0add59e62ac25578270cff1b9f619
The Token Symbol WETH should automatically appear
Click Next
Your balance transferred should now be reflected on your wallet dashboard.
Step 4: Get Some Matic
Just how Ethereum requires ETH to process transactions, Polygon requires MATIC to process its own transactions. Therefore, until we get some MATIC, we cannot use any of our Wrapped ETH. To do this, we will use what they call a faucet.
Enter your Polygon Mainnet Wallet Address
Complete the Captcha
Click Send 0.001Matic to my Address
The MATIC should land in your wallet within a minute or two
Please note, they only allow ten claims between all users every minute. We had the most luck claiming when a new minute started. Also worth noting is that you can only claim twice a day.
If you have a problem with this process and cannot claim any MATIC, please reply to this email with your wallet address, and we will happily send you some to start your journey.
Step 5: Use Polygon
Now that you have MATIC, you can use the network.
You can use exchanges like Sushi Swap or 1inch to convert your WETH into any token you want; we would suggest first converting some to MATIC (you only need two or three MATIC tokens) so you can continue using the network as the amount received through the faucet won't be enough to cover all transaction fees in the future.
Conclusion
So now you know how to move between different layer 2 solutions. Hop Protocol has sufficiently abstracted the complexities involved with the process and made it easier for everyone. We also hope you can see how projects like Hop will allow for a multichain universe where, as we have previously written, we should see individual blockchains granualizing for specific use cases over time.
If you have had any problems with the above or need some Matic to get going, please reply to this email with your wallet address or questions, and we will send you some Matic to get going and hopefully help you where we can.
Last week Facebook announced their move into the Metaverse with their name change to Meta. Therefore, as a refresher, we thought it would be appropriate to share a few of the articles and presentations we have done regarding the Metaverse and its implications going forward.
Notable Articles and News Stories This Week:
NYC Mayor-Elect Eric Adams to Take First 3 Paychecks in Bitcoin
Incoming New York City Mayor Eric Adams said on Thursday that he will take his first three paychecks in bitcoin when he takes office in January.
"In New York, we always go big, so I'm going to take my first THREE paychecks in bitcoin when I become mayor. NYC is going to be the center of the cryptocurrency industry and other fast-growing, innovative industries! Just wait!" Adams wrote in a tweet on Thursday. The tweet was in response to one from Miami Mayor Francis Suarez, who on Tuesday pledged to take his next paycheck in bitcoin.
Read more about it here
Bank of America COO: Crypto Could Add Value to Banks
As Bank of America has begun looking more into the crypto space, the bank’s chief operating officer said he believes certain characteristics of the blockchain and crypto could add a lot of value to banks.
“I believe some of the things that are happening today will provide that technological jump that allows banks to be more efficient, [have] less errors, be more compliant,” Bank of America COO Tom Montag said about crypto during a Chainalysis event on Thursday in New York City. “So we look forward to figuring out a way to use it best and have it be part of the system.”
Bank of America officially launched its cryptocurrency research division last month, led by Alkesh Shah, the bank’s head of global cryptocurrency and digital asset strategy.
Read the full story here
In Craig Wright Trial, Plaintiffs Lay Out Pattern of Fraud, Deceit and Hubris
Attorneys for Ira Kleiman and W&K Info Defense Research began to paint an unflattering portrait of Craig Wright, his business practices and interpersonal dealings in a Miami court on Tuesday and Wednesday.
These two days of testimony formed part of the plaintiffs’ suit against Wright, revolving around his business dealings with the Kleiman’s late brother, David Kleiman. The crypto community has been watching this case closely because much of the financials at the heart of the case revolve around bitcoin wallets that have been linked to Satoshi Nakamoto, the pseudonymous creator of Bitcoin.
Read more about the trial here
Whilst we all have the option to look, to seek to understand, it’s often easier not to. Bitcoin, Ethereum and distributed ledger technology are complex systems that require significant due diligence. At Etherbridge, we aim to lower the barriers to understanding this fast-growing digital economy.
If you are interested in staying up to date, please subscribe to our newsletter at etherbridge.co
This is not financial advice. All opinions expressed here are our own. We encourage investors to do their own research before making any investments.


